|  | September 05, 2017
Choosing the right DC-DC PSU August 27, 2015
AMD's Project Quantum August 13, 2015
The Redstone PC is the ultimate Mini-ITX Minecraft Machine October 09, 2014
The "Restomod TV" April 09, 2013
Installing NAS4Free February 28, 2013
Building an XBMC 12 Home Theatre PC January 25, 2011
XBMC Guide updated to version 10.0 August 06, 2010
Building a Green PC February 15, 2010
Building an ION powered HTPC with XBMC October 10, 2008
The "Cambridge Autonomous Underwater Vehicle 2008" |
| | | | September 12, 2008
"Florian", the DVD burning robot September 05, 2008
The "i-EPIA" May 22, 2008
The "GTA-PC" April 14, 2007
The "Digg" Case January 19, 2007
The "ITX-Laptop" December 07, 2006
The "Tortoise Beetle" October 02, 2006
The "DOS Head Unit" August 31, 2006
The "Janus Project" August 05, 2006
The "Leela PC" June 26, 2006
Nano-ITX in a Football May 17, 2006
The "EPIA Alloy Mod" April 11, 2006
Neatorama's Collection of Case Mods February 18, 2006
The "Rundfunker" October 24, 2005
The "ITX TV" October 06, 2005
The K'nex-ITX August 05, 2005
The "Waffle Iron PC" July 21, 2005
The "Supra-Server" July 18, 2005
The "Mega-ITX" July 07, 2005
The "Encyclomedia" May 25, 2005
The "Accordion ITX" |
| | | | May 16, 2005
The "FileServerRouterSwitch" May 15, 2005
The "Mini Falcon" May 13, 2005
The "Bender PC" May 11, 2005
The "BBC ITX B" May 10, 2005
The "Frame" April 20, 2005
The "Jeannie" March 09, 2005
The "Cool Cube" January 30, 2005
First Nano-ITX Project? January 17, 2005
The "iGrill" January 15, 2005
The "Gumball PC" December 15, 2004
The "Deco Box" December 03, 2004
The "TERA-ITX" October 06, 2004
The "Coealacanth-PC" September 17, 2004
The "Gramaphone-ITX-HD" August 26, 2004
The "C1541 Disk Drive ITX" August 25, 2004
The "SEGA-ITX" August 13, 2004
The "Quiet Cubid" August 06, 2004
The "BMWPC" July 14, 2004
The "Moo Cow Moo" July 02, 2004
The "Mini Mesh Box" Full alphabetical archive on right hand side of page... |
|
|
EPIA MII 12000 Review
EPIA
Video Resolutions
All the CLE266 EPIAs in Windows support standard VGA video resolutions
of 800x600, 1024x768, 1152x864, 1280x768, 1280x960, 1280x1024,
1400x1050 and 1600x1200 all in 16 or 32 bit colour. The boards
support standard resolutions of 800x600 and 1024x768 on a TV.
Refresh rates possible are 60, 75, 85 and 100Hz - though only with the slower refresh rates as the resolution increases.
Four other modes are available through roundabout means (Display Properties / Settings / Advanced / Adapter / List All Modes) - 720x576, 720x480 and almost WVGA widescreen 848x480, as well as good old 640x480 in up to 120 Hz. We'd have like to have seen true WVGA support (852x480), and support for HDTV resolutions (1024x720 and 1920x1080) - but it looks like VIA will save these for the next generation of EPIA.
VGA Picture quality on all EPIAs is generally
very good - only the very highest resolutions show any kinds
of blurriness. There seems to be no support (or drivers) for
non-standard resolutions, which would benefit widescreen TVs.
Connecting
an EPIA to a TV
The original EPIAs have a very simple system
for switching between TV and monitor output. If a TV is connected,
it will display on the TV at the next reboot. If a VGA monitor
is connected, the VGA output will be used. If both are plugged
in, the EPIA would display on the monitor.
The EPIA Ms and MIIs are not so simple. Without another
PC or a monitor temporarily next to your TV, it is not possible
to configure TV output under Windows. The display device is
selected in the BIOS but then subsequently the Windows graphics
driver has its own ideas, switching to its own settings after
the VGA Windows loading screen. This Windows setting has to be configured
too.
Here's how to set up TV output on your EPIA
M or MII: Attach your TV and monitor together, select CRT+TV in your
BIOS and boot normally. Both screens will boot, then the TV
will go black. Open the display control panel, click the settings
tab, then advanced, then S3Display. Select the TV so that
a blue line goes around it and then tick the box next to it.
Click 'Apply' and the TV will display again. Adjust your device
settings appropriately.
Method 2: If you have another PC there is
an easier option - install VNC
as a service onto the EPIA M, connect them both to your LAN,
switch on and adjust the control panel remotely from your
other PC.
TV
Output Quality
The classic EPIAs,
EPIA Ms and MIIs both have a VGA monitor output, an S-Video socket,
and socket switchable between RCA composite and S/PDIF functionality.
We found little difference on our TV between RCA and S-Video,
though in theory S-Video should be better. We chose the S-Video
output as we could connect straight to the front of our TV,
leaving the S/PDIF socket free for AC3 output to our digital
amplifier.
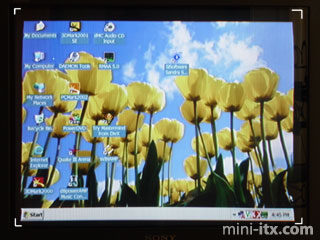
The EPIA Ms can manage
1024x768 and 800x600 resolution as standard on a TV. The output as default is an image slightly smaller than
full screen size (as marked on the edges of this photograph).
Both boards have overscan as an option, which stretches the
desktop beyond the edges of the screen (a little too far for
some purposes). Control is also possible of the absolute
picture position in software, though not with the horizontal
and vertical scaling found on
some TV output cards.
Our picture shows just how difficult it is
to photograph a CRT screen. Our picture was very clear and well colour
balanced with no shimmer or flickers. There was some distortion
around the edges of the picture - but this is not a problem
if overscan is used. By contrast, the picture quality during
bootup on a TV is awful. BIOS text is blurred and too bright
- though still usable. The key to a good picture is a half-decent cable - and if your display allows it, always use in order of preference VGA, S-Video and finally the Composite outputs.
Tip: Unless you're lucky enough to own a Plasma
with VGA input, TVs aren't designed for displaying the small
text of a Windows or Linux desktop. We changed our DPI settings
to "Large" in Display Properties/ Settings/ Advanced
and improved the text legibility dramatically.
Benchmarks - Setup Details, Five 1Ghz+ CLE266 Boards -->
|
|