
Posted on August 25, 2004
|
I made a "cable" out of three old power cables. I cut the ends off each cable then wired the ends to a 12 position barrier strip. A tip if you're doing this at home, make sure all three power cords are cut to the same length or you'll have to unwire, cut, and rewire it, and make sure the cables aren't twisted all around each other. I'm not opening the case again to get pictures, it's too packed, so I will describe what I did. I looked at the power connector on the motherboard and mapped out the wire colors and did some research on the web about ATX power cables. There are basically 9 different wires, +3v, +5v, +12v, -5v, -12v, Ground, and 3 wires that remotely turn the power supply on/off from the button on the front of your PC.
Inside the three power cords are 3 wires. I labelled each power cord A, B, and C, and wired them to the left side of a barrier strip. Then I cut all the power cords to the PC and wired in only one of each color wire, red, orange, yellow, black, white, green, gray, blue, and purple to the right side of the strip. The other end of the power cords I wired in the same order as the first strip to a second strip, so labeling your cables is important. And this is were it gets tricky. There are about 10 black wires, 8 orange, etc. that need wired into the corresponding strips to match those on the power supply end. You can get at most 3 or 4 wires wrapped together to fit in a strip, so I had to be creative which is why I chose a 12 position strip. There are 3 unused connections. Black and orange are the most common wires so I "jumpered" two of the extra connections to black by running wires between them, and the other connection I wired to orange. Then I divided up the black and orange wires into groups of 3 or 4 and wrapped and wired them into the left and right sides of the strip. The rest of the colors only had 1 or 2 to connect and were much easier. I also cut and wired in the two IDE power cables. Then used tie downs to hold that mess down to the case.
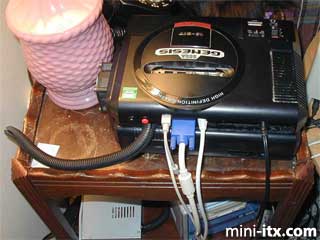
On the power supply end there were even more wires, but since I was only using one of each color wire the rest were unused. I cut all of them off and covered the ends with electrical tape to avoid contact. Then I was left with the three cables. I bought a plastic tube from Radio Shack which is split down the center. Simply shove the cables down in the tube from one end to the other. Then I made the hole in the SEGA case bigger to fit the power tube. And finally I opened up the power supply and put the strip, the tapped off wires, and the end of the power tube inside and sealed it back up. Now it looks nice and professional. ;)
|
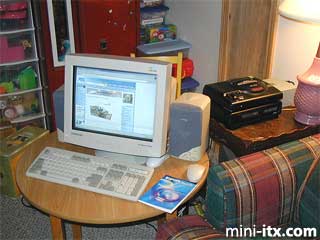
Here is the SEGA-ITX surfing the web at the VIA site. Thank you VIA! At this time I have no plans for a floppy drive. I installed everything from CD boot disks I made.
|
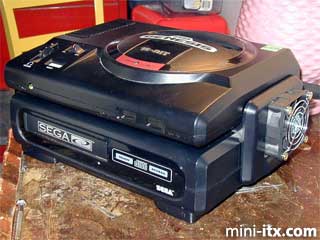
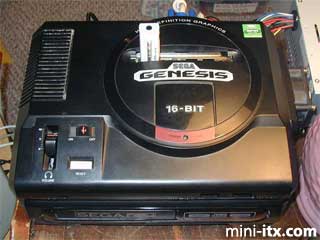
I added a fan to the side of the system since there's not much room for air circulation. It looks rather large from this angle but its really just a cpu fan. I may get a thinner one so it doesn't stick out so far. It's a little on the loud side so I used the trick of wiring it from the +12v to +5v and make it run at about +7v. Truthfully from what I've seen the system never gets hotter than "warm", unless you're running the dvd a lot, so I doubt you really need an external fan. The yellow HD activity LED I decided to wire into the hole marked for headphones on the front, and I taped off the gamepad connector holes. In order to reach the DVD drawer open button I had to drill a small hole in the face plate. I hated having to do that, but that's the only way you can open it from DOS. I use the old Apple paper clip trick to open the drawer :)
|
I cut down the cartridge door housing to make it fit again and put in the extra USB connections that came with the board. I had to cut off the firewire connectors because they were right up against the power connector and wouldn't fit. Here is my MuVo "cart" plugged in while I load up some mp3's. And to keep the SEGA case from sliding around on top of the CD case I used double faced tape in various places to stick it together. You can see the VIA EPIA mini-ITX sticker on the corner there :)
|
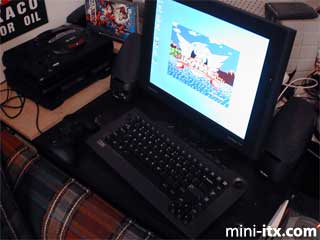
And here is the SEGA-ITX hooked up to a 15' black LCD, black cordless keyboard/mouse, black joystick, and black speakers. Looks nice in black!
|
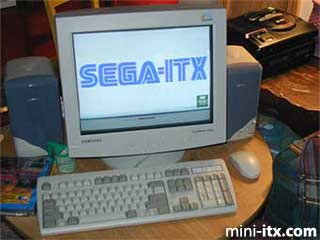
Here's the SEGA-ITX boot logo I made...
|
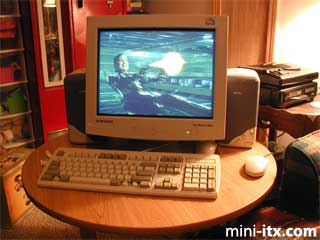
...here I'm watching Matrix Reloaded...
|
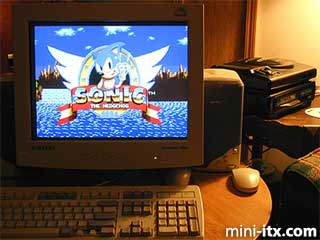
...and later playing Sonic CD right off the original disc. SEGA!
 |
 |
 |
Quick Links
Mailing Lists:
Mini-ITX Store
Projects:
Show Random
Accordion-ITX
Aircraft Carrier
Ambulator 1
AMD Case
Ammo Box
Ammo Tux
AmmoLAN
amPC
Animal SNES
Atari 800 ITX
Attache Server
Aunt Hagar's Mini-ITX
Bantam PC
BBC ITX B
Bender PC
Biscuit Tin PC
Blue Plate
BlueBox
BMW PC
Borg Appliance
Briefcase PC
Bubbacomp
C1541 Disk Drive
C64 @ 933MHz
CardboardCube
CAUV 2008
CBM ITX-64
Coelacanth-PC
Cool Cube
Deco Box
Devilcat
DOS Head Unit
Dreamcast PC
E.T.PC
Eden VAX
EdenStation IPX
Encyclomedia
Falcon-ITX
Florian
Frame
FS-RouterSwitch
G4 Cube PC
GasCan PC
Gingerbread
Gramaphone-ITX-HD
GTA-PC
Guitar PC
Guitar Workstation
Gumball PC
Hirschmann
HTPC
HTPC2
Humidor 64
Humidor CL
Humidor II
Humidor M
Humidor PC
Humidor V
I.C.E. Unit
i64XBOX
i-EPIA
iGrill
ITX Helmet
ITX TV
ITX-Laptop
Jeannie
Jukebox ITX
KiSA 444
K'nex ITX
Leela PC
Lego 0933 PC
Legobox
Log Cabin PC
Lunchbox PC
Mac-ITX
Manga Doll
Mantle Radio
Mediabox
Mega-ITX
Micro TV
Mini Falcon
Mini Mesh Box
Mini-Cluster
Mobile-BlackBox
Moo Cow Moo
Mr OMNI
NAS4Free
NESPC
OpenELEC
Osh Kosh
Pet ITX
Pictureframe PC
Playstation 2 PC
Playstation PC
Project NFF
PSU PC
Quiet Cubid
R2D2PC
Racing The Light
RadioSphere
Restomod TV
Robotica 2003
Rundfunker
SaturnPC
S-CUBE
SEGA-ITX
SpaceCase
SpacePanel
Spartan Bluebird
Spider Case
Supra-Server
Teddybear
Telefunken 2003
TERA-ITX
The Clock
ToAsTOr
Tortoise Beetle
Tux Server
Underwood No.5
Waffle Iron PC
Windows XP Box
Wraith SE/30
XBMC-ION