|  | September 05, 2017
Choosing the right DC-DC PSU August 27, 2015
AMD's Project Quantum August 13, 2015
The Redstone PC is the ultimate Mini-ITX Minecraft Machine October 09, 2014
The "Restomod TV" April 09, 2013
Installing NAS4Free February 28, 2013
Building an XBMC 12 Home Theatre PC January 25, 2011
XBMC Guide updated to version 10.0 August 06, 2010
Building a Green PC February 15, 2010
Building an ION powered HTPC with XBMC October 10, 2008
The "Cambridge Autonomous Underwater Vehicle 2008" |
| | | | September 12, 2008
"Florian", the DVD burning robot September 05, 2008
The "i-EPIA" May 22, 2008
The "GTA-PC" April 14, 2007
The "Digg" Case January 19, 2007
The "ITX-Laptop" December 07, 2006
The "Tortoise Beetle" October 02, 2006
The "DOS Head Unit" August 31, 2006
The "Janus Project" August 05, 2006
The "Leela PC" June 26, 2006
Nano-ITX in a Football May 17, 2006
The "EPIA Alloy Mod" April 11, 2006
Neatorama's Collection of Case Mods February 18, 2006
The "Rundfunker" October 24, 2005
The "ITX TV" October 06, 2005
The K'nex-ITX August 05, 2005
The "Waffle Iron PC" July 21, 2005
The "Supra-Server" July 18, 2005
The "Mega-ITX" July 07, 2005
The "Encyclomedia" May 25, 2005
The "Accordion ITX" |
| | | | May 16, 2005
The "FileServerRouterSwitch" May 15, 2005
The "Mini Falcon" May 13, 2005
The "Bender PC" May 11, 2005
The "BBC ITX B" May 10, 2005
The "Frame" April 20, 2005
The "Jeannie" March 09, 2005
The "Cool Cube" January 30, 2005
First Nano-ITX Project? January 17, 2005
The "iGrill" January 15, 2005
The "Gumball PC" December 15, 2004
The "Deco Box" December 03, 2004
The "TERA-ITX" October 06, 2004
The "Coealacanth-PC" September 17, 2004
The "Gramaphone-ITX-HD" August 26, 2004
The "C1541 Disk Drive ITX" August 25, 2004
The "SEGA-ITX" August 13, 2004
The "Quiet Cubid" August 06, 2004
The "BMWPC" July 14, 2004
The "Moo Cow Moo" July 02, 2004
The "Mini Mesh Box" Full alphabetical archive on right hand side of page... |
|
|
Scythe e-Otonashi Review
Test Drive
When I was all set, I turned the unit on. And...nothing. Not a sound. If the green LED didn't light up, I wouldn't know it was on. I turned on the TV and watched it boot up MiniMyth. I just left it idle and continually checked the temp. It was holding steady at around 18 degress C, which is quite impressive since it ran about 17.5 degress C with the fan.
So I decided it was time to run a few more tests. Playing a TV show, which on the ME 6000 would normally get the box up to about 40-50 degrees C, only ran this machine up to about 25 degress C. So far this case is looking great.
The one test that seems hardest on these little frontend machines is playing music while displaying a graphically intensive visualization. So I started playing MythMusic with the Goom plugin. I ran this test on the M 10000 for 1 hour while it still had the fan and was sitting in an open cardboard box. The temp got up to about 44 degress C, well below the recommended limit of around 80 degrees C. I ran the same test for 1 hour using this new case and the temp leveled off at 55 degress C. So it got a little warmer without the fan, but still not even close to the limit. A small price to pay to have a completely silent system.
Real World Performance
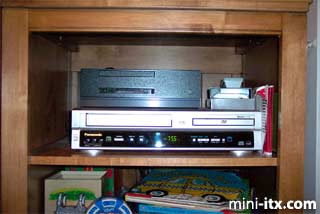
After a test drive on my desk, I decided to try it in a "production" setting in my family room. I removed my current unit which is an ME6000 in a Morex cubid 2688, and simply put this one in its place. Here you see it installed on top of my VCR:
Even though there is a fair amount of space around it, there is not much airflow and the top of the VCR gets pretty warm when it is turned on (which it usually is).
I ran the same test as before; playing music while the Goom plugin was running. I left it doing that for 1 hour. The temp got up to 63 degrees C. A little warmer but still below the limit and this is the highest I can expect it to go. Again, I want to emphasize that I used the thermal compound that came with the case and not an expensive silver-based one.
When I ran the same test on my ME 6000 in the Morex case (again, with a case fan going) the temp hit 72 degress C. A little high for my comfort.
Reconnecting the Heatpipe
Some time after I wrote this review, I started having problems with the CPU temperature getting excessively high. For example, playing MythMusic with the Goom visualization was getting the temperature up to 75 degrees C within about 5 minutes. I couldn't let it run for more than that for fear of it getting too hot. I also noticed the heatsink on the bottom of the case was hot. So it seemed like heat from the CPU was making its way to the heatpipe. I sent an email to the manufacturer to get some help with the situation. I got a response from Scythe saying to check the contact of the heatpipe with the heatsink. A similar problem had occurred with one of their demo machines. It took a while, but I finally got some time to disassemble the system.
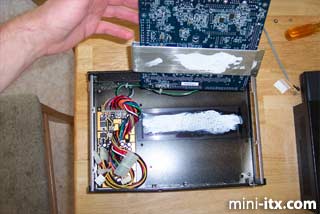
I checked the bottom of the heatpipe and sure enough, only about half of the heatpipe was contacting the case. In the picture below you see the thermal compound is only on the right half of the heatpipe (and one finger smudge on the left side). In trying to figure out why there was so little contact with the heatpipe, I discovered that it was warped slightly upward, rising away from the bottom of the case. No matter how tightly I secured the heatpipe, some of it was not going to make contact.
The heatpipe is easily bent, so I gently straightened it out as best I could and secured the heatpipe and CPU heatsink to the EPIA mainboard. I also added more thermal compound to make sure the entire area meant for the heatpipe was covered. I placed mainboard back in the case and secured it with the heatpipe brackets (I did not screw down the mainboard to the case at this time). I then removed the heatpipe brackets and lifted the mainboard back out to check for increased heatpipe contact (as evidenced by increased thermal compound on the bottom of the heatpipe) and it looked much better. I reassembled the entire unit and placed it back in the family room.
I powered up the system and the temperature looked nice and low. I jumped straight to the tough test and started MythMusic with the Goom Pluggin. After running for over an hour, the temperature remained under 60 degrees C, which is less than the 'Real World' value I originally observed.
Problem solved.
By the way, one of the approaches that was not recommended was upgrading to an expensive thermal compound. I was told this would likely make only a 1 or 2 degree difference. Also I was advised to make sure the compound is not too thick. You want just enough to ensure contact between the heatpipe and the heatsink.
Conclusions
I am very excited about this case. It performs well, is completely silent, and looks nice. Once I am able to build an infrared receiver for it I'll be replacing my ME 6000 with this unit. Since the EPIA M 10000 Nehemiah has a full-speed FPU (as apposed to the half-speed FPU on the ME 6000) my favorite Goom visualization runs must faster (thus looking much more impressive). The system overall responds much better as well.
If you can work it into your budget, I would definitely recommend this case with a Via EPIA M 10000 Nehemiah system over the fanless EPIA ME 6000.
Additional Information
While this review focused on how to assemble the system and how it performs for my application, there are two other reviews available that may give you more information about general uses for this case.
The 3d Game Man did a video review of the Scythe e-Otonashi case (previously called the EPIA-1000 case). It is available here.
Another review was done by SilentPCReview.
Two good sources of information about the Via EPIA M motherboards are ViaArena.com (especially the forums) and Mini-ITX.com.
|
|